How to Position a Baby in a Car Seat for Passport Photos
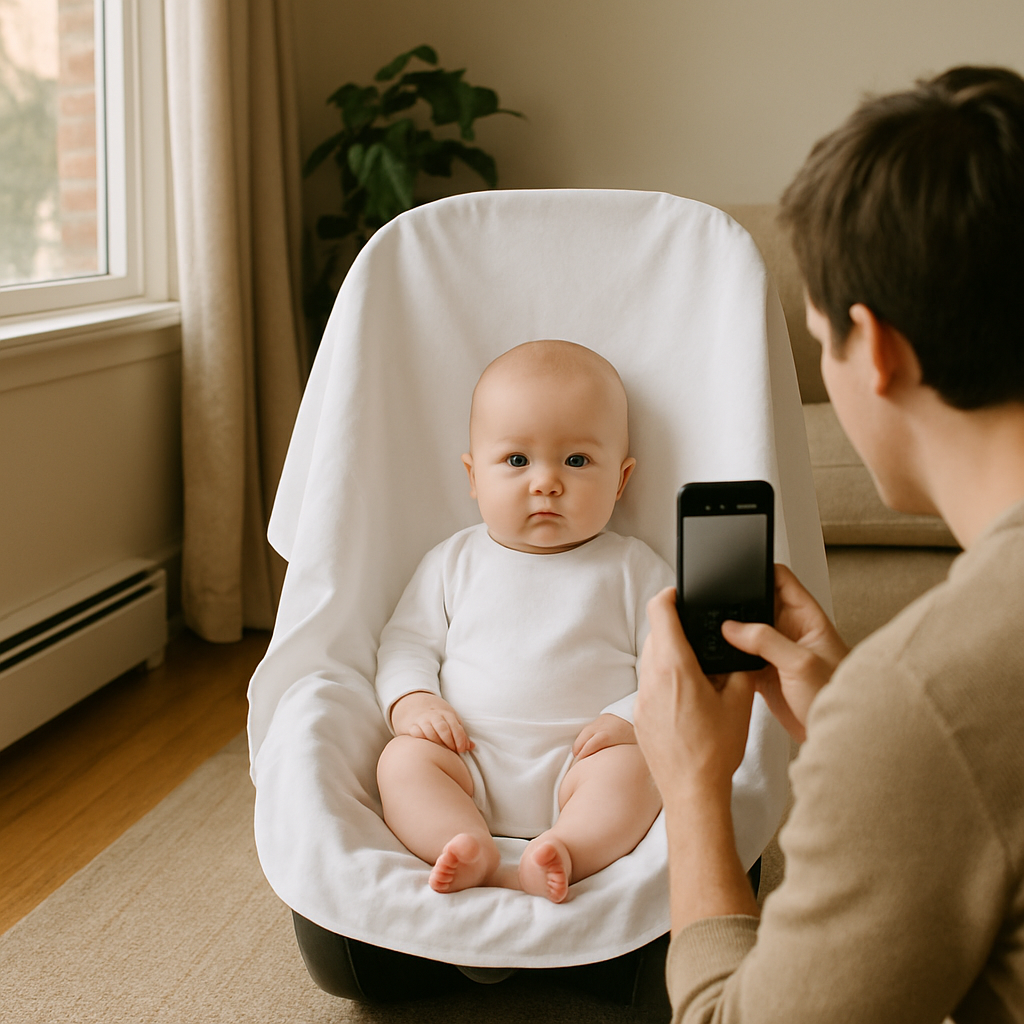
Getting a passport photo for a baby sounds easy. Until it isn’t. One minute the infant is calm. The next, there’s a wiggle, a yawn, a dramatic head tilt - and suddenly the photo looks like an abstract painting. Anyone who has tried understands the struggle. Babies don’t follow instructions. They don’t sit still. And they certainly don’t care about government photo requirements. Still, it’s absolutely possible to take a compliant baby passport photo using a car seat. It just takes strategy, patience, and a bit of clever positioning. This guide walks through exactly how to position a baby in a car seat for passport photos, step by step, without turning the experience into a full-blown meltdown.
Why Use a Car Seat for Baby Passport Photos?
A car seat offers structure. Support. Stability. Newborns and young infants can’t sit upright on their own. Laying them flat on a blanket works, but it often leads to shadows, head tilts, or uneven backgrounds. A properly positioned car seat provides natural support for the neck and shoulders while keeping the baby safely cradled. If you ask most experienced parents, they’ll tell you - the car seat trick is a game changer. But here’s the catch: it has to be done correctly. Otherwise, you risk shadows, visible straps, or a photo that gets rejected.
Understanding Passport Photo Requirements for Babies
Before adjusting a single strap, it helps to know what officials actually require. For U.S. baby passport photos, the basics include:
- White or off-white background
- Baby facing the camera directly
- Eyes open (if possible for newborns)
- No visible hands from parents
- No shadows
- No car seat straps visible
- Neutral expression preferred
Sounds simple, right? In reality, capturing all of that in one frame can feel like juggling while riding a bike.
Step-by-Step: How to Position a Baby in a Car Seat for Passport Photos
Here’s where things get practical.
1. Choose the Right Car Seat
Not all seats are equal for photography. Infant bucket seats work best because they recline naturally and offer full head support. Convertible seats can work too, but they’re bulkier and harder to position against a clean background. The key is stability. The seat should sit flat on the floor, not wobble, and keep the baby centered.
2. Create a Plain White Background
This is where many people slip up. Drape a white sheet or blanket over the car seat. Smooth it out completely. No wrinkles. No texture shadows. Make sure it covers:
- The sides of the seat
- The headrest area
- Any visible brand labels
Think of it like building a tiny photo studio. The fabric becomes the wall behind the baby. Pro tip - use a thick white sheet to prevent dark seat colors from showing through.
3. Adjust the Baby’s Position
Now comes the delicate part. Gently place the baby into the seat after the white sheet is arranged. Adjust the fabric around the head so it appears like a flat white background rather than a curved seat. The baby’s head should:
- Be centered
- Face straight toward the camera
- Not tilt to one side
If the chin drops too far down, use a rolled white towel underneath the sheet for subtle support. Invisible adjustments make a huge difference.
4. Hide the Straps Completely
This part is non-negotiable. Car seat straps cannot appear in the final image. Loosen them carefully and tuck them behind the baby, ensuring safety is still maintained during the short photo session. Never remove necessary support padding if the baby needs it - just conceal it beneath the white covering.
5. Check Lighting - This Changes Everything
Lighting can make or break the shot. Natural daylight near a window works best. Avoid overhead lights that cast harsh shadows under the chin or behind the head. Position the seat so light falls evenly across the baby’s face. No dramatic side lighting. This is a passport photo, not a magazine shoot. If shadows appear, adjust the angle slightly. Small tweaks matter.
6. Get at Eye Level
Many people stand above the baby and shoot downward. That’s a mistake. The camera should be level with the infant’s face. Kneel if necessary. Align the lens directly in front of them. Imagine you’re making eye contact. That’s the angle you want.
7. Capture Multiple Shots Quickly
Babies have moods. Rapidly changing ones. Take several photos in succession. Blink. Yawn. Tiny head turn. It happens fast. Shooting in bursts increases the chance of getting one compliant frame. Patience helps. So does timing the session after feeding and a short nap.
Common Mistakes That Lead to Passport Photo Rejection
Rejections are frustrating. They delay travel plans. They add stress no one needs. Here are frequent issues to avoid:
- Visible car seat edges
- Background not fully white
- Shadows behind the head
- Baby looking off-camera
- Parent’s hands in frame
- Open mouth in mid-cry
Honestly, most rejections happen because of lighting or background problems - not the baby’s expression.
What If the Baby Won’t Cooperate?
It happens. Sometimes the infant refuses to open their eyes. Sometimes they won’t stop moving. What then? Try these tactics:
- Make soft clicking sounds near the camera
- Use a quiet rattle positioned behind the lens
- Wait for a calm window instead of forcing it
- Keep the room comfortably warm
Rushing rarely works. Calm energy does.
Editing and Finalizing the Image
Once you’ve captured a solid shot, resist the urge to over-edit. Passport rules prohibit heavy retouching. No filters. No smoothing. No digital background swaps unless done correctly. The image should:
- Be 2x2 inches (for U.S. passports)
- Have the head sized appropriately within frame
- Remain clear and unaltered
This is where professional tools can save time. Services like BabyPassportMaker.com help parents format and verify images to meet official guidelines without guesswork. Because guessing? That’s how applications get delayed.
Why the Car Seat Method Works So Well
Here’s the thing. Babies crave support. The car seat mimics the snug, secure feeling they’re used to. It limits excessive movement while keeping them comfortable. Compared to laying an infant flat on the floor, the seat offers gentle contouring that keeps the head stable. Think of it as scaffolding for a tiny human. And stability equals a higher chance of a usable passport photo.
Quick Checklist Before Submitting
Before uploading or printing, run through this:
- Is the background completely white?
- Are there zero visible straps?
- Is the baby centered and facing forward?
- Are shadows eliminated?
- Is the image high resolution?
If every answer is yes, you’re likely in good shape.
Final Thoughts on Positioning a Baby in a Car Seat for Passport Photos
Positioning a baby in a car seat for passport photos isn’t complicated - but it does require attention to detail. It’s a balancing act between comfort and compliance. Between patience and precision. The good news? With the right setup, soft lighting, and a little persistence, parents can absolutely capture a photo that meets requirements without stepping foot in a studio. And once it’s done, it’s done. One small photo. One big milestone. Tiny traveler, ready for the world.