Australian Passport Photo Size and Guidelines: A 2026 Setup Guide
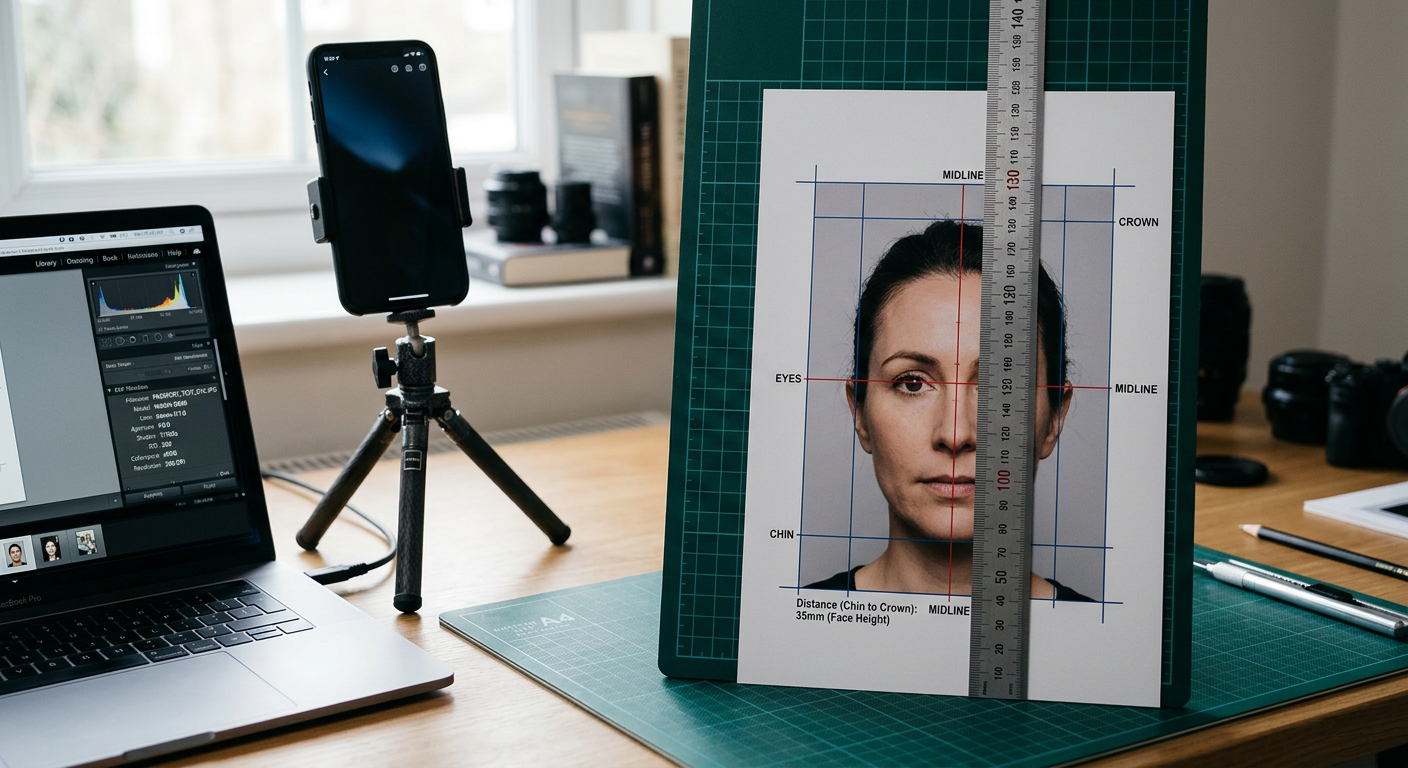
An applicant stands at the post office counter while the clerk measures their printed application image with a clear plastic template. The chin sits two millimeters too low, and the application is rejected on the spot. Achieving the correct australian passport photo size is not about taking a flattering portrait; it is about feeding a government biometric scanning machine the exact geometric map it expects. Small deviations in lighting, posture, or physical dimensions trigger automated system rejections long before a human ever reviews the file.
Quick Summary
The australian passport photo guidelines mandate strict biometric ratios and uniform lighting to ensure facial recognition software can map structural landmarks. Success relies on precise mechanical setup rather than software correction.
- Outer dimensions: Prints must measure between 35mm and 40mm wide by 45mm and 50mm high.
- Inner dimensions: The head must measure 32mm to 36mm from the bottom of the chin to the crown of the head.
- Lighting and background: Even, shadow-free illumination against a plain light gray or cream background.
- Digital compliance: Unaltered original files with intact metadata, completely free from digital retouching.
Table of Contents
- 1. Determining the Required Australian Passport Photo Size
- 2. Lighting Geometry and Background Control
- 3. Posture, Expression, and Lens Distortion
- 4. Exporting the Digital File Without Alteration
- Common Pitfalls & Troubleshooting
- FAQ
- Recommended Reads
1. Determining the Required Australian Passport Photo Size
Physical Boundary and Crown Ratios
The foundational requirement for an Australian application is geometric accuracy. The outer passport photo dimensions australia dictates are strictly 35mm to 40mm in width and 45mm to 50mm in height. However, placing a small head inside that frame results in an immediate failure. The government specifically evaluates the internal ratio: the subject's face must measure exactly 32mm to 36mm from the point of the chin to the crown of the head.
The mechanism behind this rule is spatial mapping. Biometric scanners use the eyes, nose, and mouth as anchor points. If the head is too small within the frame, the pixel density between these anchor points drops below the scanner's minimum threshold, causing a read error. The "crown" refers to the anatomical top of the skull, not the top of the hair. If a subject has high-volume hair that extends beyond the top of the skull, that hair is excluded from the 36mm maximum measurement.
To check your alignment today, print a test sheet and use a standard metric ruler. Measure from the lowest visible point of the chin directly upward. If the measurement lands at 31mm or 37mm, the photograph must be rescaled before printing the final version. Never rely on the "fit to page" option in your print dialogue, as it automatically scales the image down by several percentage points to accommodate printer margins, instantly ruining your meticulous sizing.
2. Lighting Geometry and Background Control
Eliminating Edge Shadows and Light Wrap
Background choice and lighting placement dictate how cleanly the biometric software can segment the subject's face from the environment. The guidelines require a uniform light gray or plain cream background. Pure white backgrounds are actively discouraged because they cause a photographic phenomenon called light wrap, where reflected light bleeds over the subject's jawline, erasing the hard physical edge the software uses to determine the face's width.
Lighting must be flat and omnidirectional. Dramatic or angled lighting creates a shadow on one side of the nose, which the scanning software interprets as a physical deformity or an asymmetrical facial structure. To achieve flat lighting mechanically, the primary light source must originate from directly behind the camera lens, illuminating both sides of the face equally. A window works perfectly, provided the subject faces the glass squarely on an overcast day.
Practical rule: Position the subject at least one meter away from the background wall to ensure that the light falling on them does not cast a hard, black drop-shadow directly behind their neck.
If you find the background appears too dark on camera, do not adjust the exposure on the subject. Introduce a secondary, weaker light source aimed solely at the background to lift the color back to light gray without altering the flat illumination on the face.
3. Posture, Expression, and Lens Distortion
Flat Planes Protect Facial Landmarks
Facial expression rules exist exclusively to keep the muscular structure of the face in a baseline state. Smiling pulls the corners of the mouth outward, raises the cheeks, and narrows the eye apertures. Because the biometric map calculates the exact millimeter distance between the pupils and the corners of the lips, a smile completely invalidates your baseline geometry. The subject must maintain a relaxed jaw, closed mouth, and wide-open eyes.
The camera lens introduces its own distortion. Smartphone cameras default to wide-angle lenses, which capture a broad field of view by slightly curving the incoming light. If you hold a phone half a meter from the subject's face, the center of the face (the nose) swells, and the ears recede backward. This perspective distortion will result in rejection. The camera must be positioned roughly 1.5 meters away from the subject at exact eye level. Use the optical zoom function to re-frame the face without moving physically closer.
Posture control is particularly challenging with dependents. A newborn lacks the neck strength to sit upright, making the strict chin-to-chest angles difficult to maintain. Detailed strategies, such as placing the infant flat on a padded light gray surface, are outlined in the Australian Baby Passport Photo Guide, which covers how to support the head without bringing hands or props into the visible frame.
4. Exporting the Digital File Without Alteration
Compression Artifacts Trigger Automated Rejections
Transferring and saving the image requires technical care to ensure the digital passport photo australia receives retains its structural integrity. The system strictly prohibits image manipulation. This prohibition extends beyond obvious changes like removing a blemish or smoothing skin; it includes applying automated beauty filters, background-blurring portrait modes, and structural sharpening algorithms built into modern smartphone camera apps.
When you submit an australian passport photo online through the official portal, the backend system parses the image file's EXIF metadata. If it detects signatures of heavy photo-editing software, the file is immediately flagged. Furthermore, the file must be a standard baseline JPEG, usually under a specific file size limit like 3MB, but large enough to retain clarity (above 50KB).
The most common way digital passport photos australia applicants capture are ruined is through improper file transfer. Sending the original photograph via a text messaging app or a social media messenger applies aggressive data compression. This compression groups pixels together in blocks, creating jagged edges around the pupils and nostrils that confuse biometric algorithms. To maintain quality, transfer the file directly via email at "Actual Size" or through a lossless cloud storage folder. For broader context on managing digital files during travel preparations, consult these Baby Passport Photo Tips & Travel Guides.
Common Pitfalls & Troubleshooting
Navigating the physical and digital requirements often leads to one of four distinct failures. They look similar to the untrained eye but demand completely different mechanical solutions.
The 'Floating Head' Contrast Failure * Symptom: The subject's shoulders blend seamlessly into the background, causing the face to appear disconnected. * Diagnosis: The subject wore a light gray, cream, or pale white shirt that matched the required background color exactly. Scanners require clear definition of the shoulders to establish the vertical center of the frame. * Fix: Have the subject wear a dark, solid-colored shirt (navy, black, or dark green) to create a sharp, high-contrast boundary between their torso and the light background.
Red-Eye Correction Alteration * Symptom: The file is rejected for "digital alteration," despite the applicant making no manual edits in Photoshop. * Diagnosis: The smartphone camera detected a flash reflection in the subject's pupil and automatically applied an AI red-eye reduction patch. This patch effectively paints over the eye, destroying the biological texture of the iris. * Fix: Turn off the camera flash entirely. Rely exclusively on steady, natural window light to illuminate the face, which prevents red-eye at the source and bypasses the phone's automated editing triggers.
The Micro-Tilt Distortion * Symptom: The final print looks technically correct, but the distance between the ear and the edge of the cheek is noticeably wider on the left side than on the right. * Diagnosis: The subject's head was rotated just a few degrees off-center, or the camera lens was not perfectly parallel to the face. * Fix: Position the camera on a tripod. Ask the subject to look directly into the dead center of the lens. Check that both ears are equally visible before capturing the shot.
Newborn Hand Interference * Symptom: A small blur or finger is visible near the edge of the baby's jaw or shoulder. * Diagnosis: A parent's hand, used to stabilize the infant's neck, crept into the crop zone. The guidelines mandate that no other person or object can be visible in the frame. * Fix: Roll a small, dark towel and place it firmly under the infant's shoulders beneath the clothing, or swaddle their arms tightly below chest level so the head naturally rests straight without external hand support.
FAQ
Can I wear my glasses in the photograph? No. The Australian government strictly forbids the wearing of glasses in passport photographs. This rule is absolute, regardless of whether the frames are thin or the lenses have anti-reflective coatings. The only exception involves a rare, severe medical condition that prevents the removal of glasses, which requires an official medical certificate signed by a registered practitioner.
What is the easiest way to secure the correct light gray background at home? A standard white wall usually photographs as gray if it is not directly illuminated, but it is prone to texture shadows. The most reliable method is purchasing a sheet of matte light gray poster board from a craft store. It provides a uniform, texture-free surface that perfectly matches the required tone without causing the light wrap associated with stark white bedsheets.
Can I print the final image at a standard retail photo kiosk? Yes, provided you control the print settings. The kiosk must use high-quality dye-sublimation photo paper. You must manually disable any "auto-enhance" or "fit to page" settings on the kiosk screen, as these will alter your precise 35x45mm digital framing and introduce illegal contrast adjustments.
Is it acceptable to smile slightly if my mouth remains closed? No. A closed-mouth smile still engages the facial muscles, lifting the cheeks and altering the baseline biometric measurements around the jaw and eyes. Your expression must remain entirely neutral and relaxed.