How to Take a Compliant Newborn Passport Photo in 2026
You are standing over a squirming infant lying on a white sheet, holding a smartphone above them, making desperate noises to get them to look directly at the lens. You know that if their head tilts three degrees to the left, or if a shadow falls across one ear, the government portal will automatically reject the newborn passport photo and delay your travel plans by weeks. Getting biometric compliance from a subject who cannot hold their own head up requires specific environmental control, not luck.
Quick Summary
Capturing a compliant infant passport photo means establishing flat lighting, stabilizing the infant's head to meet biometric alignment rules, and using a lens focal length that does not distort facial features.
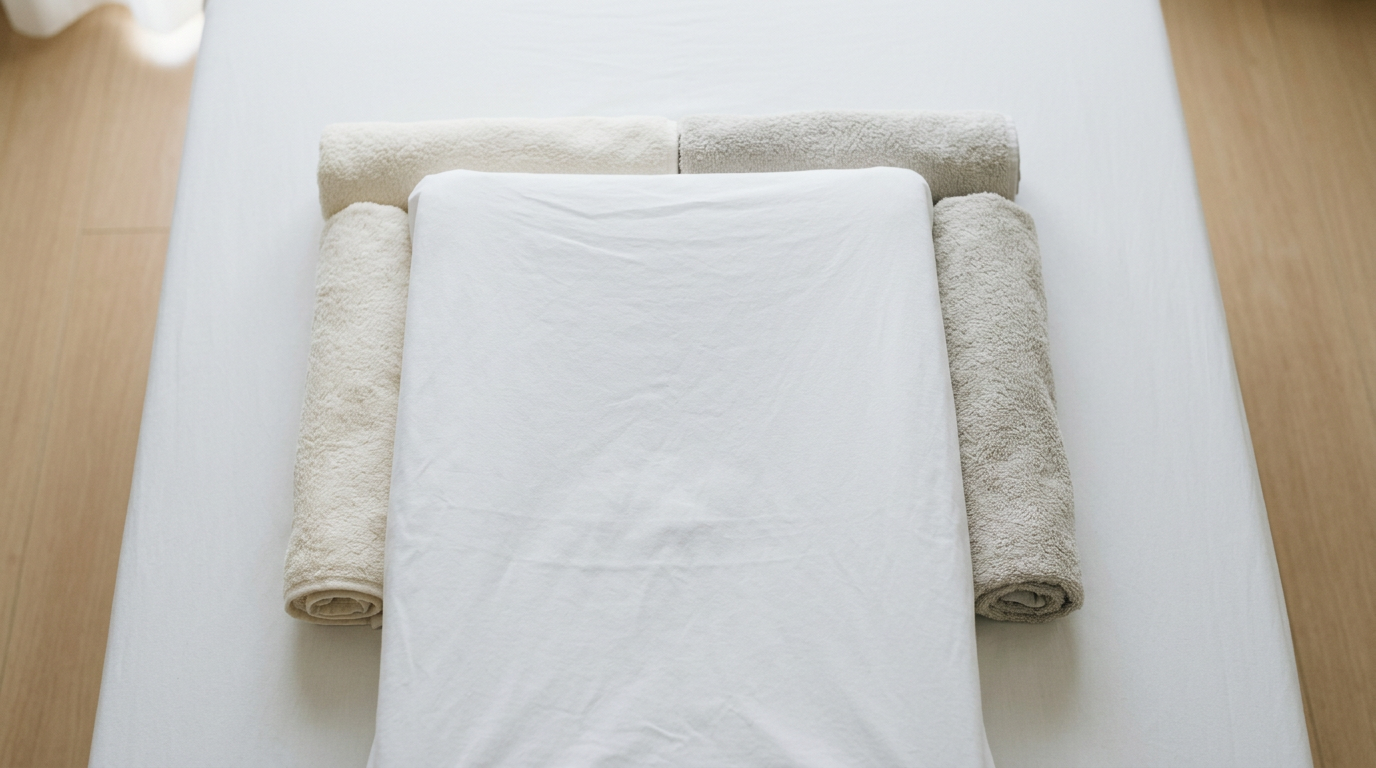
- Position the infant on a plain white or light gray background using rolled towels under the sheet for neck support.
- Utilize indirect, diffused window light to eliminate unilateral shadows across the face.
- Keep the camera parallel to the infant's face at a distance of at least three feet to prevent barrel distortion.
- Ensure both eyes are open (depending on regional exceptions) and hands are completely out of the frame.
- Format the final image to strict government dimension and resolution requirements before submission.
Table of Contents
- 1. Preparing the Environment for Even Lighting
- 2. Positioning Your Infant Safely and Correctly
- 3. Managing Facial Expressions and Eye Contact
- 4. Ensuring Proper Camera Settings and Distance
- 5. Formatting to Meet Newborn Passport Photo Requirements
- Common Pitfalls & Troubleshooting
- FAQ
- Recommended Reads
1. Preparing the Environment for Even Lighting
The most frequent reason automated passport systems reject an image is uneven lighting. Government biometric software requires the subject's face to have uniform illumination so the algorithm can measure the exact distance between the eyes, the width of the nose, and the contour of the jaw. When one side of a face is brighter than the other, the software interprets the shadow as a physical deformity or an edge, causing an immediate failure.
To achieve flat, shadowless lighting, you must avoid direct sunlight and overhead household bulbs. Household lighting creates deep shadows under the eyes and chin, while direct sunlight creates harsh contrast and makes the infant squint. The optimal setup is a room with a large window facing north (or a window not receiving direct sunlight at that time of day).
Lay a firm surface, such as a changing pad or a flat mattress, on the floor directly in front of the window. The light should fall across the infant's face evenly. If the light from the window is still too directional, hang a sheer white curtain or tape a sheet of white tissue paper over the glass. This diffuses the light, scattering it so it wraps around the infant's features rather than striking them from a single angle.
A common mistake parents make is placing the infant so the window is on their left or right side. This creates split lighting, illuminating half the face and leaving the other in shadow. Instead, the infant's feet should point directly toward the window, with the photographer standing over them (taking care not to cast their own shadow over the subject). This ensures the light travels down the length of the face, filling in the eye sockets evenly. For additional fill light, you can place a white poster board near the infant's head to reflect light back onto the face.
2. Positioning Your Infant Safely and Correctly
Biometric standards require the head to be perfectly centered, looking straight into the camera, with the shoulders visible and squared. For a newborn who lacks neck strength, achieving this posture requires structural support hidden from the camera's view. You cannot hold the baby in your arms, as parental hands or clothing appearing in the frame will result in instant rejection.
The most reliable method is laying the infant flat on their back. Cover your firm surface with a plain white, wrinkle-free sheet or blanket. If you are preparing a new born passport application, the background must be starkly plain, free of patterns, textures, or secondary colors.
Because newborns naturally let their heads loll to the side, you must build a brace underneath the sheet. Take two small hand towels, roll them into tight cylinders, and place them on the mattress in a V-shape. Drape the white sheet tightly over these towels. When you lay the infant down, their head should rest in the center of the V, with the rolled towels gently preventing their head from rolling left or right.
Practical rule: Pull the background sheet taut and tape it to the floor or mattress edges to eliminate fabric wrinkles, which automated scanning software often misinterprets as non-compliant background objects.
The mistake people make here is allowing the infant's chin to drop to their chest. A tucked chin obscures the neck and alters the biometric proportions of the lower jaw. To correct this, ensure the surface beneath the shoulders is slightly elevated, or gently stroke the infant's forehead to encourage them to tilt their chin up. The camera must be positioned exactly parallel to the plane of the infant's face. If you shoot from too low an angle, looking up the nose, the photo will be rejected.
3. Managing Facial Expressions and Eye Contact
Most adult passport photos require a neutral expression with the mouth closed and eyes open. For infants, especially those under one year of age, many governments relax these rules slightly, but you must still aim for a neutral baseline to guarantee acceptance. An open mouth is often accepted for newborns, but closed eyes are generally a strict failure unless specifically exempted by regional regulations.
Getting an infant to look directly at the lens is a mechanical challenge. Do not use the camera flash to grab their attention; the sudden burst of light will cause them to blink, squint, or cry, and it creates a harsh drop shadow behind their head that fails compliance checks. Instead, use a high-contrast object or a quiet rattle. Hold the object directly behind your smartphone camera lens. Move it slowly until the infant tracks it with their eyes, then gently shake it to lock their focus right as you trigger the shutter.
Do not make loud noises or exaggerated faces, as this prompts the infant to smile, laugh, or cry. A crying face contorts the biometric markers, shifting the cheekbones and narrowing the eyes, which software cannot process accurately. If the infant becomes distressed, stop the session. Attempting to force compliance from a crying baby wastes time and yields unusable images. Wait until they are fed, rested, and calm.
A frequent failure mode is capturing the infant looking slightly off-camera. While their head might be pointing forward, their pupils are darting to the side to look at a parent standing nearby. Ensure that you are the only person interacting with the infant during the exposure, keeping their gaze locked squarely on the lens housing.
4. Ensuring Proper Camera Settings and Distance
Smartphone cameras default to wide-angle lenses, typically equivalent to a 24mm or 26mm focal length on a full-frame camera. When you hold a wide-angle lens close to a subject's face to fill the frame, it introduces severe barrel distortion. The nose appears bulbous, the ears recede, and the biometric geometry of the face is warped.
To prevent facial distortion, you must move the camera further away from the subject. Stand at least three to four feet (about one meter) above the infant. Because you are shooting from further away, the infant will appear smaller in the frame. Do not use digital zoom to compensate, as this degrades the image resolution. Instead, capture the wider shot at maximum resolution; you will crop the image later during the formatting stage.
Ensure your camera is set to its standard photo mode, not 'Portrait Mode'. Portrait mode utilizes artificial intelligence to blur the background (the bokeh effect). This edge-detection algorithm frequently mistakes the fine hairs on an infant's head or the edges of their ears for the background, blurring them out. A passport photo must have sharp focus from the tip of the nose to the background. Disable all filters, beauty enhancements, and skin-smoothing features.
The mistake users make is failing to level the camera. If your smartphone is tilted slightly forward or backward, it creates a keystone effect, making the top of the head appear larger than the jaw, or vice versa. Use your camera's built-in grid feature. Look for the crosshairs that appear when the camera is pointing straight down; align them to ensure your phone is perfectly parallel to the floor before taking the photo.
5. Formatting to Meet Newborn Passport Photo Requirements
Once you have a sharply focused, well-lit image, you must crop and format it to meet exact government specifications. These infant passport photo requirements dictate the overall dimensions of the print, the percentage of the frame the head must occupy, and the exact distance from the bottom of the chin to the top of the head.
For example, getting an Australian passport photo for an infant requires the final print to be 35mm to 40mm wide and 45mm to 50mm high. Within that frame, the head size (from the crown to the chin) must measure between 32mm and 36mm. If you crop the image so the head measures 30mm or 38mm, the application will be rejected, regardless of how good the lighting is.
Many parents attempt to print these themselves or use retail kiosks. Getting an infant passport photo at Walgreens or similar pharmacies often involves placing a struggling baby in a public environment under harsh fluorescent lights, which is why taking the photo at home is preferred. However, if you take the photo at home and simply upload it to a generic 4x6 print service without formatting the specific biometric crop, the resulting print will be useless.
You must use a dedicated cropping tool designed for biometric documents to set the exact chin-to-crown ratios. These tools overlay the specific government template onto your image, ensuring the eyes fall within the mandated horizontal band and the head size is compliant. When saving the file, ensure it is exported at a minimum of 600 DPI (dots per inch) to prevent pixelation during the government's digital review process.
Common Pitfalls & Troubleshooting
Even with careful preparation, photos are frequently rejected for subtle technical failures. Identifying the specific error prevents you from repeating it in the next attempt.
The Background Shadow Rejection
- Symptom: A dark halo or heavy shadow appears on the white sheet directly behind one side of the infant's head.
- Cause: This is the most frequent cause of rejection. It happens when the primary light source is too directional or the infant's head is resting too far above the background surface.
- Fix: Move the infant further away from direct light into a softer, diffused area. Ensure their head is resting directly on the sheet, not propped up on a thick, visible pillow that creates depth and shadows.
The Fabric Texture Rejection
- Symptom: The photo is rejected for a "non-compliant background" despite using a white sheet.
- Cause: The camera focused sharply on the heavy weave of a blanket, or the fabric was bunched up around the infant's ears, creating visible folds.
- Fix: Switch to a high-thread-count, smooth cotton sheet. Pull it tightly across the supporting surface to eliminate all wrinkles. The background must read as a solid color, not a textured object.
The Off-Center Gaze Rejection
- Symptom: The infant's head faces the camera, but the iris is pushed to the corner of the eye.
- Cause: A second parent or a distraction was located to the side of the camera during the shot.
- Fix: Ensure the immediate environment is completely silent and distraction-free. The photographer should be the only point of focus, using a visual aid held directly over the camera lens to center the infant's pupils.
The Cropped Shoulder Rejection
- Symptom: The photo fails because the shoulders are not visible or are framed incorrectly.
- Cause: The photographer zoomed in too tightly on the face, cutting off the upper torso, which governments use to determine proper posture and alignment.
- Fix: Back away. Frame the shot to include the infant's chest and the top of their arms. You will crop the image down later, but you need the raw visual data of the shoulders to satisfy formatting templates.
FAQ
Do newborn passport photos need their eyes open?
Yes, the vast majority of international passport standards require the infant's eyes to be open and clearly visible. Some jurisdictions allow slight leniency for newborns under a few weeks old, but submitting a photo with closed eyes significantly increases the risk of rejection. Aim to take the photo immediately after a nap when the infant is alert.
Can a parent's hands be in the infant passport photo?
No. The presence of a parent's hand, arm, or clothing anywhere in the frame is an automatic failure. You must support the infant using rolled towels hidden beneath a white sheet, ensuring no external support is visible to the camera.
What should a newborn wear for a passport photo?
Dress the infant in solid, dark-colored clothing that contrasts strongly with the plain white or light gray background. Avoid white shirts, which blend into the background, and avoid busy patterns, large logos, or bulky hoods that obscure the neckline or jawline.
Why was my infant's passport photo rejected for low resolution?
If you zoomed in digitally using your smartphone camera, or if you sent the image through a messaging app (like WhatsApp or iMessage) before uploading it to the portal, the file was compressed. Always shoot at the standard wide angle, send the file via email at 'Actual Size', and crop it using specialized formatting software.