How to Get Passport Photos Ready for Online Submission in 2026
You just received the automated email: "Application Paused - Unacceptable Photograph." You spent hours figuring out how to get passport photos formatted for the government upload portal, only for the system to instantly reject the digital file because of a faint shadow on the background. Getting passport photos approved online requires passing the image through rigid algorithmic filters before a human reviewer ever looks at it. The portal software measures pixel density, biometric facial mapping ratios, and background uniformity. If your file fails the machine check on any of these vectors, your application stops entirely. The difference between an immediate approval and a weeks-long delay lies entirely in how you prepare, capture, and compress that single digital file.
Quick Summary
Formatting a digital passport photo for successful online submission requires aligning your image file with strict automated government sorting criteria before uploading. This involves securing flat lighting, maintaining precise biometric proportions, and exporting a compressed file that meets exact pixel dimensions without generating digital artifacts. - Use diffuse natural light to eliminate facial and background shadows entirely. - Keep a minimum camera distance of four feet to prevent optical lens distortion. - Scale the chin-to-crown measurement to fill most of the vertical frame while leaving strict buffer margins. - Export the final file without using third-party background removal tools that flag as tampering.
Table of Contents
- 1. How to get passport photos past automated lighting filters
- Why diffuse natural light prevents algorithmic shadow rejection
- 2. Distance the camera to prevent lens distortion
- The mechanics of focal length and facial mapping
- 3. Position the subject for exact biometric centering
- How algorithms calculate the chin-to-crown ratio
- 4. Format the digital file without destroying image data
- Balancing pixel density requirements against strict upload limits
- 5. Standardize the background without manual editing
- Why edge-detection filters flag digital manipulation
- Common Pitfalls & Troubleshooting
- FAQ
- Recommended Reads
1. How to get passport photos past automated lighting filters
Why diffuse natural light prevents algorithmic shadow rejection
Government facial recognition software reads shadows as structural facial features. A shadow cast under the nose by a ceiling light is interpreted by the algorithm as an extended lip or a deformed jawline. The background must be uniformly lit so the edge-detection algorithm can isolate the shoulders and head from the white space behind them. If the lighting creates a gradient on the wall - bright on the left side, dark on the right - the software will flag the file for an uneven background density.
The most common failure mode occurs when applicants use standard overhead room lighting and place the subject directly against a wall. This setup casts a hard, dark outline directly behind the shoulders and under the chin, completely confusing the background separation algorithms that verify the image during the upload process.
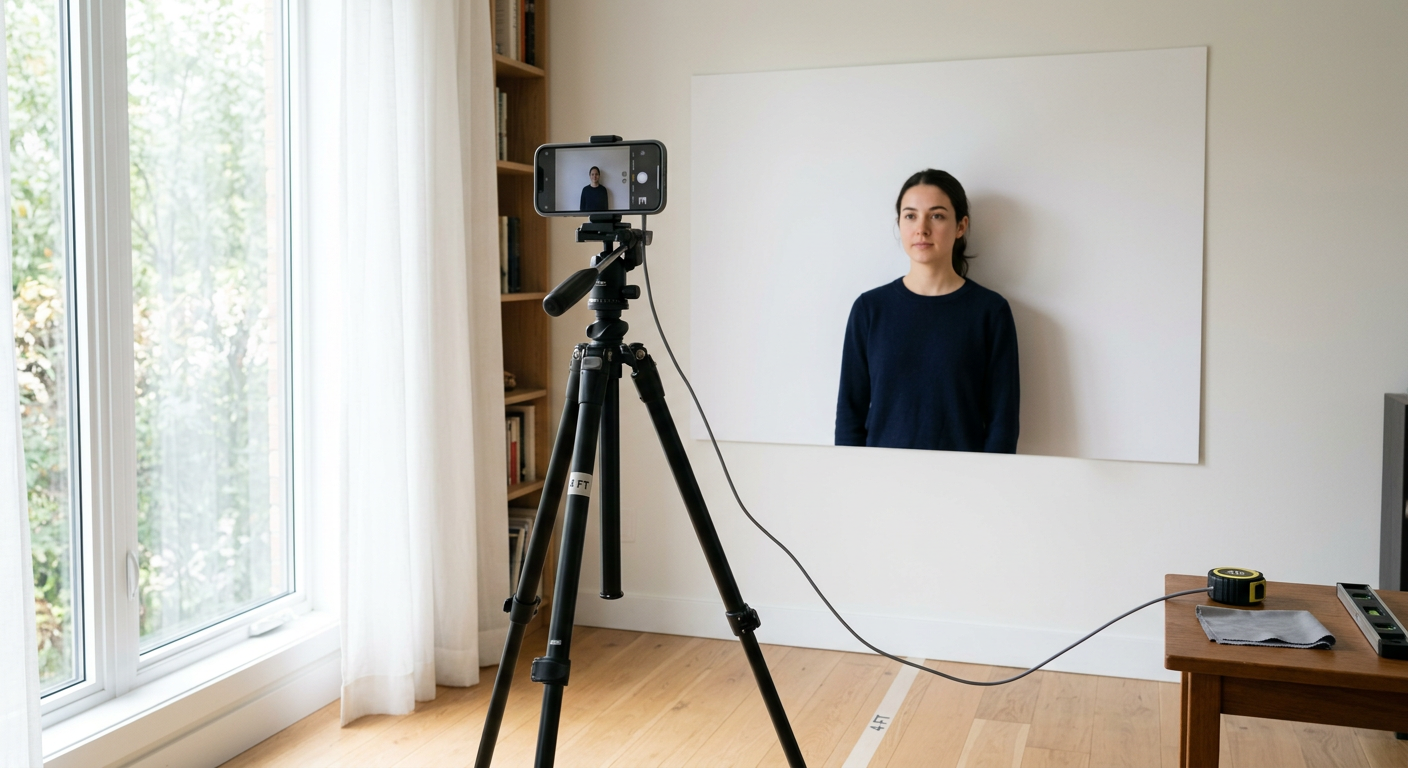
To fix this, you must rely on flat, diffuse illumination that hits the face head-on. The light source must be larger than the subject to wrap around the facial contours and fill in any potential shadows before the camera records them.
Practical rule: Position the subject facing a large window on an overcast day, and step away from the wall behind them so any remaining cast shadow drops to the floor rather than onto the background.
When preparing the environment, turning off all artificial lights is critical. Mixing a yellow tungsten room light with blue daylight from a window confuses the camera sensor, resulting in an unnatural skin tone flag that stops the application.
2. Distance the camera to prevent lens distortion
The mechanics of focal length and facial mapping
Smartphone cameras default to wide-angle lenses, usually equivalent to a 24mm or 28mm focal length. At close range, this physical lens curvature distorts the center of the image. It bulges the nose outward, pushes the eyes apart, and narrows the ears backward. Biometric screening systems measure the exact physical distance between the pupils and the width of the jawline to verify an identity. Wide-angle distortion changes these relative distances, causing an immediate mismatch against standard human facial geometry.
The mistake people constantly make here is holding the phone twelve to eighteen inches from the subject's face to fill the frame entirely with the head. Getting passport photos of infants often forces parents to lean directly over the baby with this standard wide lens, which guarantees a rejection for biometric distortion.
You must stand back at least four to five feet from the subject. At this distance, the optical distortion resolves, and the facial features render flat and anatomically accurate. You can then use your device's telephoto lens to crop closer without introducing wide-angle curving. If you are managing this process for a baby, exploring 10 Best Ways to Get Your Newborn Passport Photo Taken can help you configure this physical distance correctly without compromising their posture.
3. Position the subject for exact biometric centering
How algorithms calculate the chin-to-crown ratio
To map faces mechanically, automated sorting algorithms overlay a rigid digital template onto your submitted image. The head must fill a dominant portion of the vertical frame, measured by leaving specific buffer zones above the head and below the chin. This chin-to-crown ratio is calculated from the lowest point of the chin up to the top of the skull, explicitly ignoring the volume of the hair. The upper torso and shoulders must also remain clearly visible in the lower quarter of the frame to establish the vertical axis of the spine.
Applicants often try to frame the shot perfectly in the camera app. They leave just a millimeter above the hair. This leaves the portal's automatic cropping software no margin to adjust the image. The automated cropper attempts to lock onto the eyes and center them in the required digital crosshairs. This pushes the image upward. It cuts off the bottom of the chin and invalidates the photo entirely.
Frame the initial shot extremely loose. Capture the subject's torso down to the mid-chest and leave a massive margin of blank wall space above the head. You will crop the image later during the formatting phase. Understanding How to Get the Correct Passport Size Photo in 2026: Official Guidelines and Standards is crucial before you attempt to define these boundaries. If you are submitting to highly specific regional systems, reviewing How to Meet the Chinese Passport Photo Size and Submission Standards demonstrates how narrow these framing tolerances actually are across different governments.
4. Format the digital file without destroying image data
Balancing pixel density requirements against strict upload limits
Online submission portals demand a highly conflicting set of technical specifications: you must provide a high-resolution image (often 600 by 600 pixels or a specific rectangular pixel count at 300 DPI) while keeping the file size incredibly small (often under 250KB). When you save a JPEG file, the software discards subtle color data to shrink the file size. Aggressive compression creates digital artifacts, which look like blocky, jagged pixels around high-contrast areas like the edges of the eyes or the hairline.
The mistake applicants routinely make is taking a screenshot of the photo on their phone in an attempt to reduce the file size quickly. Taking a screenshot strips the essential EXIF metadata, drops the embedded resolution to a mere 72 DPI, and introduces screen-resolution artifacts. The portal will reject the file instantly for insufficient resolution, even if the image looks perfectly sharp on your mobile screen.
You must export the original file directly from a dedicated photo editor or processor, adjusting the JPEG quality export slider precisely to hit the required kilobyte limit while preserving the exact pixel dimensions. Evaluating a guide like Where to get digital passport photos: A complete guide for 2026 will reveal which platforms handle this specific backend compression math automatically without destroying the underlying facial data.
5. Standardize the background without manual editing
Why edge-detection filters flag digital manipulation
The background in your file must be plain white or light grey, entirely free of textures, patterns, shadows, or creases. Because achieving a perfectly flat background at home is difficult, many applicants attempt to replace the background digitally after the fact.
When you use manual eraser tools or generic background removal features found in standard consumer photo apps, the software leaves harsh jagged pixels, a floating halo effect around the hair, or inadvertently deletes parts of the ears. Government security software specifically scans image files for these exact markers of digital alteration to prevent identity fraud. If the automated system detects a digitally replaced background that was not generated using compliant, biometric edge-smoothing techniques, it permanently flags the image as tampered and halts the application.
The core error is hanging a wrinkled bedsheet behind the subject and trying to blur the wrinkles out later using a digital airbrush tool. You must shoot against a genuinely flat, matte surface like a poster board or a completely smooth, well-lit wall. If software processing is absolutely required to clean up a background, you must rely on systems built explicitly for compliance rather than generic photo editing. Assessing Free Online Passport Photo Tools: Are They Safe? explains how improper background removal compromises file integrity. Furthermore, reviewing Best Passport Photos Online 2026: Mobile Apps and Digital Tools Compared provides a clear view of which tools manage background standardization without triggering tampering flags.
Common Pitfalls & Troubleshooting
Online portal rejections often give extremely vague error codes. These three failures look identical from the outside - usually manifesting as a generic "Image Quality Error" - but require completely different technical fixes. The most frequent real cause of a delayed rejection is the first one.
The "Invalid Background Density" Rejection - The Symptom: The automated portal accepts your initial upload, but a human reviewer rejects the file a week later citing background issues, even though the background looks perfectly plain white to the naked eye. - The Diagnosis: You captured the image using the portrait mode setting on a modern smartphone. This feature uses algorithmic processing to artificially blur the background, which inevitably bleeds the sharp edges of the subject's ears and hair into the white space behind them. The manual reviewer spots this edge-blurring instantly as unauthorized digital manipulation. - The Fix: Disable all depth-effect, portrait, and cinematic modes entirely in your camera application. Reshoot the image using the standard lens setting to ensure a sharp, unedited edge across the entire silhouette.
The "Resolution Too Low" Upload Block - The Symptom: The government portal immediately blocks the file upload, stating it fails minimum pixel or DPI requirements, despite the photo being taken on a brand-new, high-megapixel camera. - The Diagnosis: You transferred the file from your phone to your computer via a messaging application before uploading it. Communication apps heavily compress images in transit to save bandwidth, completely stripping the required DPI metadata and reducing the file to a web-friendly thumbnail. - The Fix: Transfer the raw file via email using the actual size setting. Alternatively, use a direct cloud drive sync to move the untouched file from the device directly to your desktop.
The "Unnatural Skin Tone" Flag - The Symptom: The subject's face appears distinctly orange, aggressively yellow, or severely washed out in the digital file, immediately failing the automated color balance check. - The Diagnosis: You subjected the camera sensor to mixed lighting. You placed the subject near a window to capture natural blue daylight but left the overhead tungsten room light turned on. The camera's automatic white balance cannot reconcile two entirely different color temperatures simultaneously. - The Fix: Turn off absolutely every artificial light in the room, including desk lamps and hallway lights. Rely exclusively on the singular temperature of the window light to allow the camera sensor to calibrate correctly.
FAQ
Does a digital passport photo need to be a specific aspect ratio? Yes, the required aspect ratio dictates the exact square or rectangular dimensions of the digital canvas. The United States requires a strict 1:1 square ratio formatted at 600 by 600 pixels. In contrast, the United Kingdom and Australia demand a rectangular crop that matches the proportions of a 35 by 45-millimeter physical print. Uploading the wrong ratio distorts the face completely when the portal system attempts to stretch or compress it into the correct frame.
Why do automated portals reject photos for red-eye removal? Government biometrics guidelines strictly prohibit the digital alteration of any permanent facial features. Basic red-eye removal tools function by overwriting the actual pixels of the iris with artificial black pixels. This destroys the true biometric data of the eye. If you capture red-eye in the image, you cannot edit it out; you must reshoot the photograph with the camera flash turned off completely.
Can I wear eyeglasses in a digital passport photo? In almost all major global jurisdictions today, eyeglasses are strictly prohibited in official biometric photos. Even if the frames are thin and do not obscure the eye line, the glass lenses inevitably reflect the primary light source or the smartphone flash. This reflection creates a bright white glare that obscures the pupil. The automated scanner will fail the image immediately upon detecting any reflective interference over the eyes.
How does file size compression affect the upload process? Every government portal enforces a strict maximum kilobyte limit to manage server storage. If you compress a JPEG file too aggressively to meet a tight 250KB limit, the resulting digital artifacts destroy the sharpness of the eyes and the crisp edges of the face. To reduce file size safely, you must crop out unnecessary background space first, before you resort to lowering the image quality export slider.